Planning Flat Boards With a Draw Knife Videos
i / 57

Half Pencil Marks Exact Copies
While trying to trace an exact re-create of the throat plate for my table saw, I came upward with this dandy technique using an ordinary pencil. I only shaved my pencil into a half-pencil by advisedly grinding it on my belt sander. The flat border enables my modified pencil to ride straight up along the edge of the template. It also works great for mark and and so shaping inlays for my woodworking projects. — Tim Reese.
2 / 57
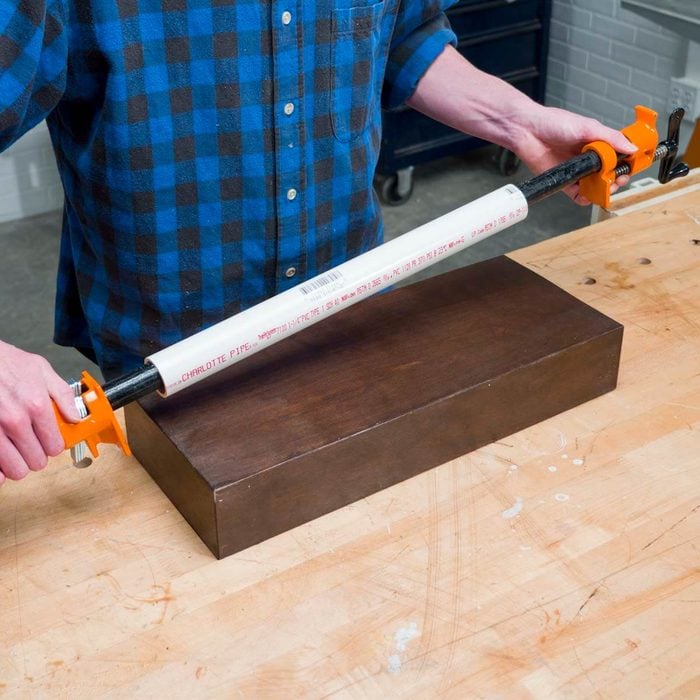
Perfect Bar Clamp Cover
Iron pipe clamps can hands mar softer woods or react with the gum to stain the forest. My solution is to cut a department of plastic PVC pipe to size and place information technology effectually the piping. If yous have several short lengths, you tin space them strategically to adapt different widths of stock wood. — Tim Johnson.
3 / 57
Bonus: Watch this video to see some of favorite woodworking tips in activity:
iv / 57
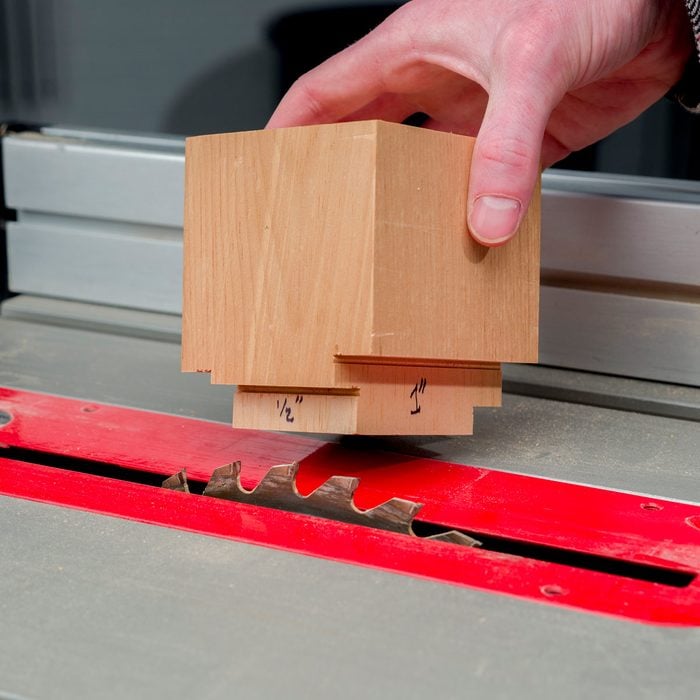
Quick Blade-Height Guess
This gauge cake is the quickest manner to set the height of a table saw blade. This one is fabricated from a 3-in. length of 4×4 cut to the settings used most often. If you need more than settings, just create another block.
Then when information technology's time to reset the table saw blade, these blocks volition assistance you get the chore done chop-chop
v / 57
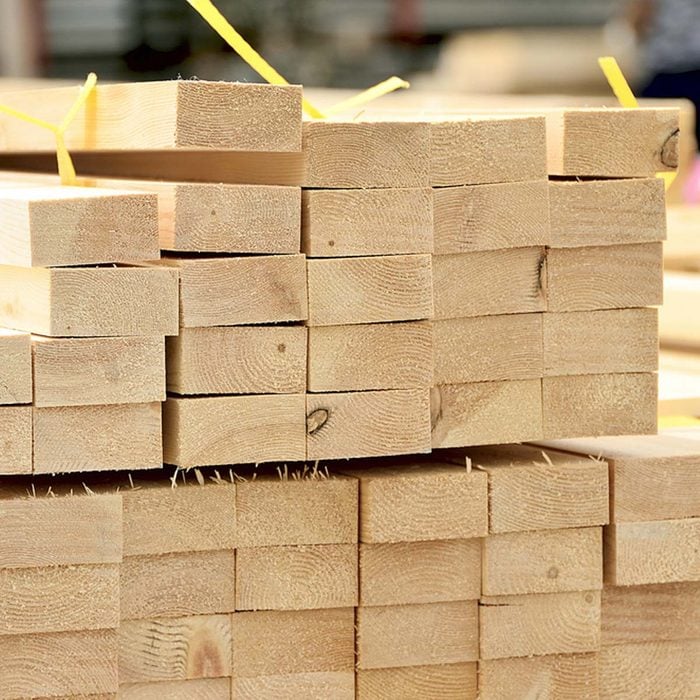
What'southward the Reason for Nominal Dimensions?
For many of us, the moment we learned that a two×four board is actually 1.five inches x 3.5 inches was but mind-blowing. The reason for this credible contradiction is that the board has been planed downward to eliminate irregularities. At one betoken, many years ago, 2x4s actually were ii inches x 4 inches, only their rough surfaces made them difficult to stock and handle. The one-time terms, such equally 2×four or 4×four, are yet used, and are known as the "nominal" size of the board. These nominal sizes are used because they are easier to say and they stick to tradition.
6 / 57
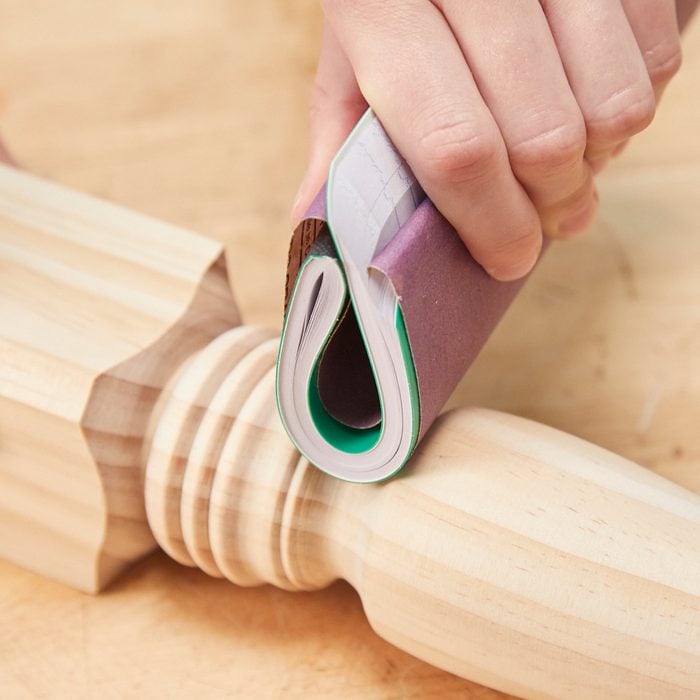
Flexible Sanding Block from the Office
Sanding curves is tricky. Sometimes you need a sanding pad that'due south both firm and flexible. A small notepad works great. Simply wrap sandpaper around the pad and curve the pad to whatsoever arc yous need. Slip the one finish of the sandpaper between the pages to help hold it in place on the pad. Give this a effort the next time you're working on a project that has curves and tough to reach spots.
vii / 57
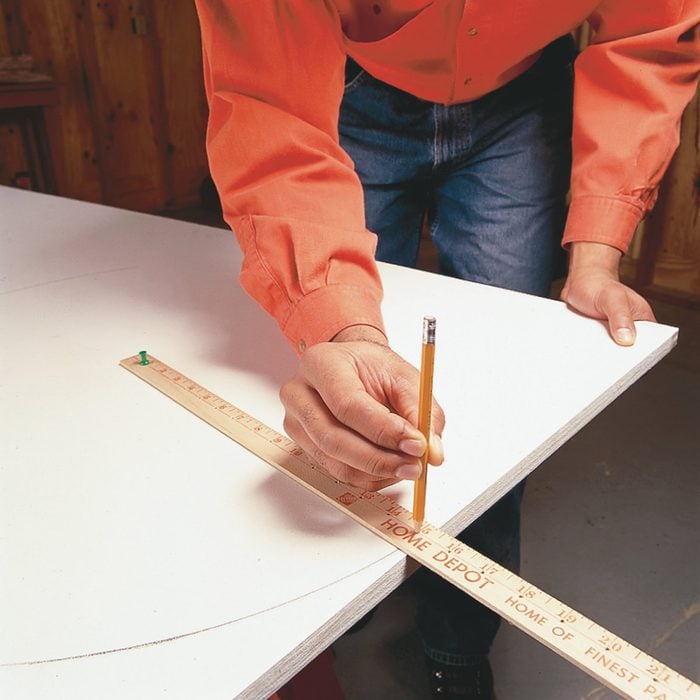
Simple Circumvolve Layout Tool
This elementary jig makes laying out circles a breeze. Drill a 1/viii-in. hole through every inch mark on a ruler or chiliad-stick. To describe a circle, place a pin through the number "ane" into the center of your board. Add 1 in. to the radius of the circle you wish to draw, and insert a pencil into this number. Using the pivot equally a pivot, rotate the pencil to mark the circumvolve. — Edwin Constantino.
viii / 57
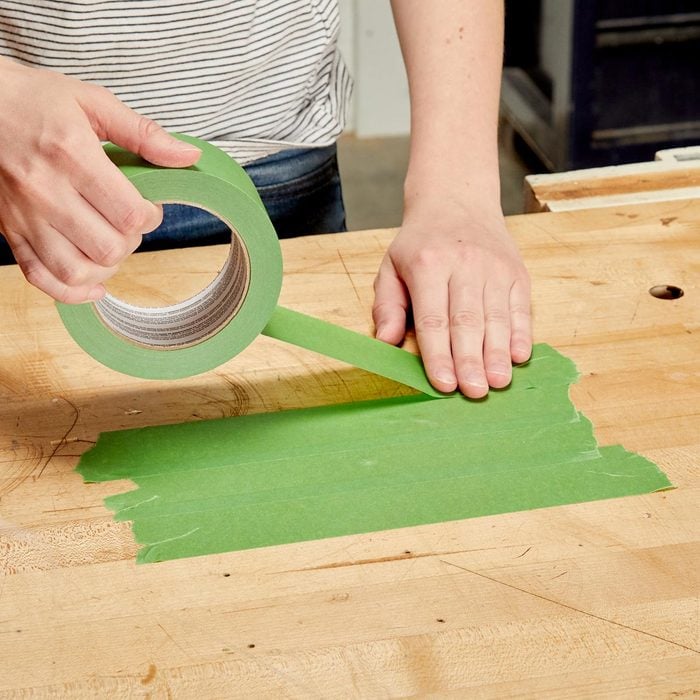
Make a Quick Mixing Surface
Instead of using a container to mix a small amount of epoxy, just brand a mixing surface on your workbench using painters tape. Simply lay downward strips, overlapping the edges so the epoxy doesn't get on your bench. When you're done, peel off the tape and throw it away. This mixing surface will work for more than merely epoxy, you can use it for wood glue or whatsoever other material you need piece of cake admission to while working on a project.
9 / 57

Inexpensive Stain Sprayer
Hither's an easier way to stain or seal chairs, lattice or anything with numerous tight recesses. Pour the stain into a make clean, empty spray bottle. Spray the stain onto the project and wipe up the excess with a brush or rag. The sprayer will squirt stain into all those tight, hard-to-reach cracks and joints. — Valrie Schuster.
10 / 57
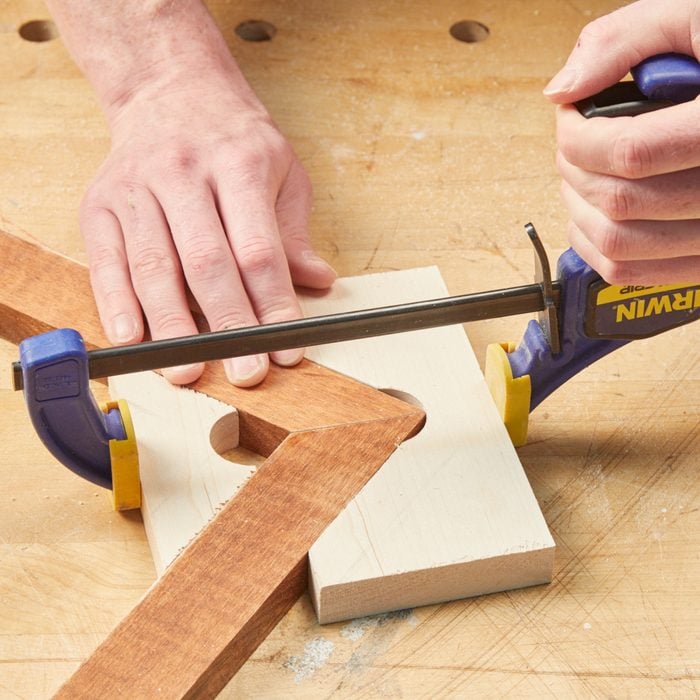
Never-Fail Miter Joint Clench
Clamping upward four mitered corners is tricky. You can purchase specialty clamps for this, but I make my own. Here'due south how to exercise it: First with a long i×four, equally it'south easier (and safer) to clamp for making the angled cuts than a curt piece. Mark out the blocks, and then drill a 1-in. diameter hole in the center of each one. The hole prevents the blocks from getting glued to your project. Cut 45-degree angles tangent to the hole, and then cutting the blocks complimentary from the long board.
11 / 57

Slick Table Saw Tip
I find the best way to protect my bandage-iron tabular array saw top is to occasionally rub on a coat of paste wax. This gives me a dainty, slick top for easier material feeding, and if I baste glue on the surface, it won't stick. It likewise helps prevent surface rust when the air is boiling. — Jack Linden.
12 / 57
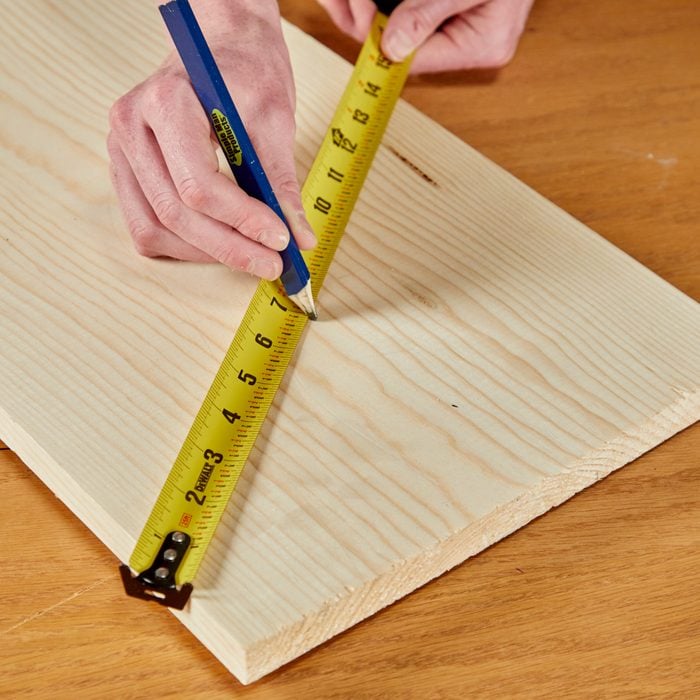
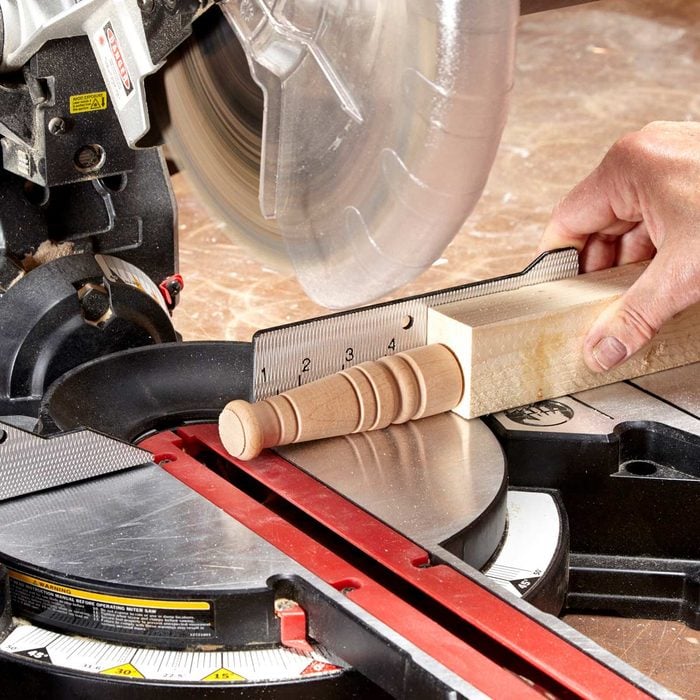
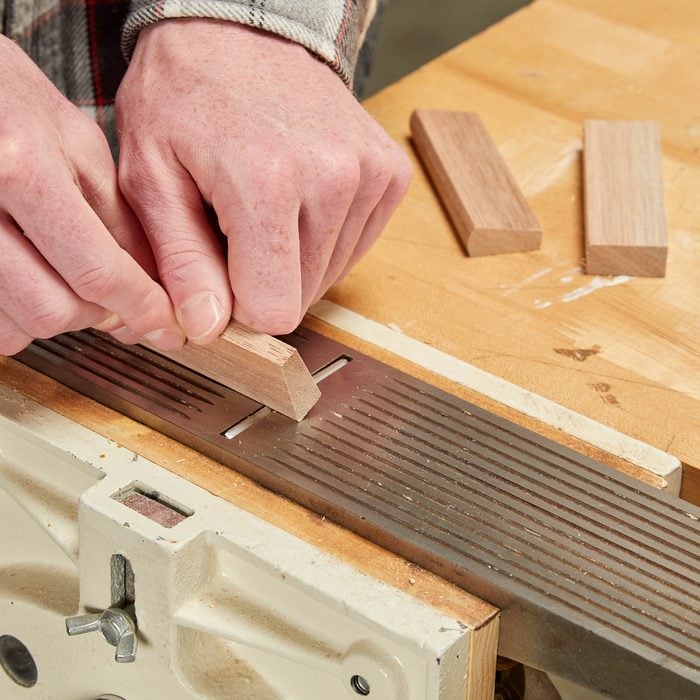
Like shooting fish in a barrel Odd-Width Measuring
How practise you split 11-three/viii-in. (or any other mathematically difficult number) into equal parts without dividing fractions? Simple. Bending your measuring tape across the workpiece until it reads an hands-divisible dimension and make your marks with the record angled. For example, say you desire to divide an 11-3/viii-in. board into three equal parts. Angle the record until information technology reads 12-in., and so make marks at "four" and "eight".
13 / 57
Condom When Cut Pocket-sized Parts
Recently I needed to cut some minor article of furniture legs on my miter saw. With their irregular shape, they were impossible to hold safely, so I fastened each leg to a bit two×2 with a dowel screw. These assemblies stayed straight and kept my hands far from the blade. — David Alexander.
14 / 57

Improvised T-Bevel
Non long ago, I needed to make some angled wood parts to build a new soffit on my garage. I didn't have the customary tool for the chore, but I had some steel joining plates. I screwed through one of the holes in the plate, set my bending, and then added some other screw to lock the angle. I could then utilise it every bit a template to mark all the pieces at the same angle and cut them with my round saw. — Ryan Bartsch
15 / 57

Bi-Fold Workbench
Old doors laid across sawhorses make great temporary workbenches, but they have upwards a lot of infinite when you're not using them. Instead of full-size doors, I use bifold doors with hinges and then I can fold them up when I'k washed working. They're also easier to haul around in the pickup for on-the-road jobs. — Harry Steele.
16 / 57
What is Quarter-Sawn Lumber?
A board is considered "quarter-sawn" when the growth rings run, more or less, perpendicular to the face up of the board. Quarter-sawn boards mostly have direct grain and are less prone to shrinkage, compared to other boards. These factors don't come into play with the 2x4s you use to frame a closet—but it does with the shelves and cabinetry you put into that closet; you desire those boards to remain directly, apartment and stable.
Some quarter-sawn boards, peculiarly those of white oak, showroom gorgeous rays or flecks; a hallmark of much Craftsman-way furniture. Because of their stability and beauty, quarter-sawn boards are often actively sought out by woodworkers—pregnant they may likewise come with a heftier price tag.
Illustration by Melanie Powell, from "Woodworking FAQ" past Spike Carlsen (Story Publishing, 2012)
17 / 57
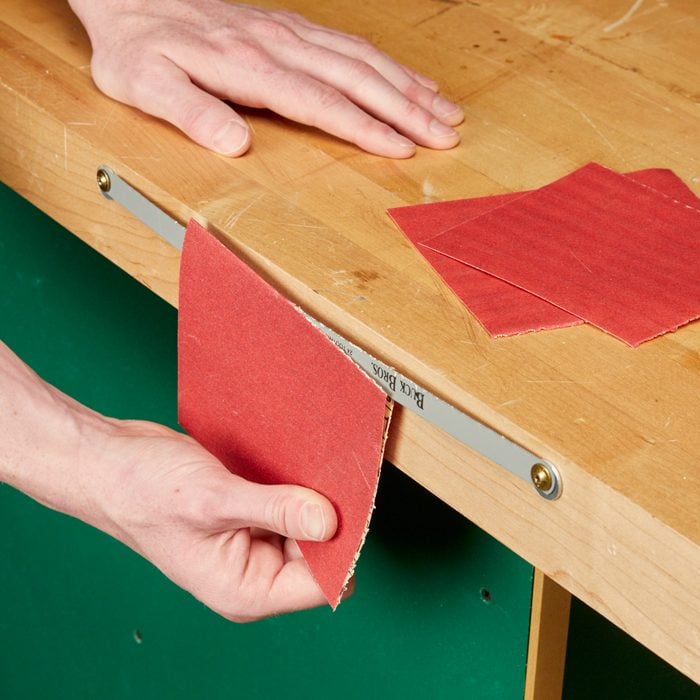
On-Hand Sandpaper Cutter
Cut sandpaper is a quick manner to dull your pair of scissors or utility pocketknife bract. Instead, I fastened a hacksaw blade to the edge of my workbench. I slipped a washer behind the bract at each of the mounting holes so a canvas of sandpaper to easily slides in behind the blade. I fold the paper where I want to cut, just as a reference. — Kim Boley.
18 / 57
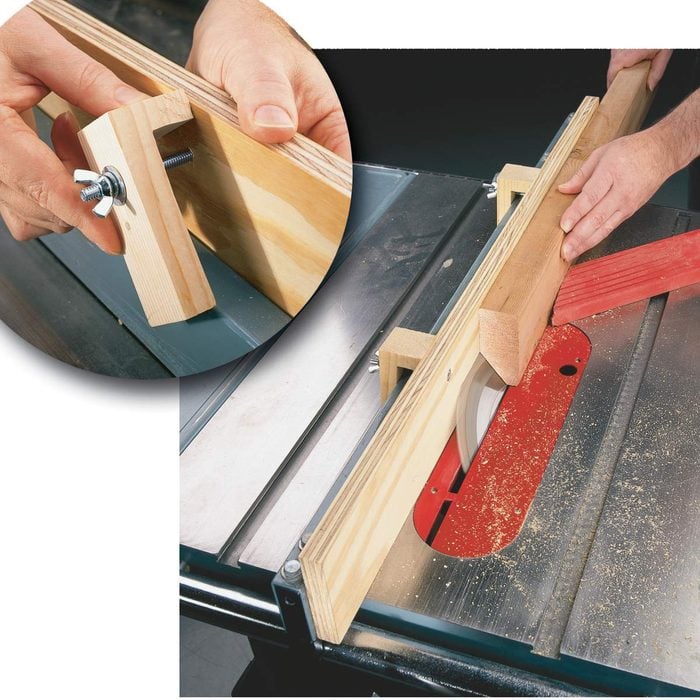
Make Your Own Table Saw Fence
This self-clamping table saw fence takes only seconds to put on and lets yous crank the blade into the fence to create both angled cuts forth lath edges and extremely thin rip or rabbet cuts. With a hand- or jigsaw, cut pieces from a 1×4, making the within width of the "L" a pilus under the thickness of your saw'southward fence. Drill 5/xvi-in. holes in the L-blocks and plywood fence and bring together them with 2 1/4-in. x 3-in. countersunk machine screws, washers and Wing-Basics. Equally ever, utilize extra caution when you're sawing without a blade guard. Our cheers for this new sawing angle to professional person furniture maker George Vondriska.
19 / 57
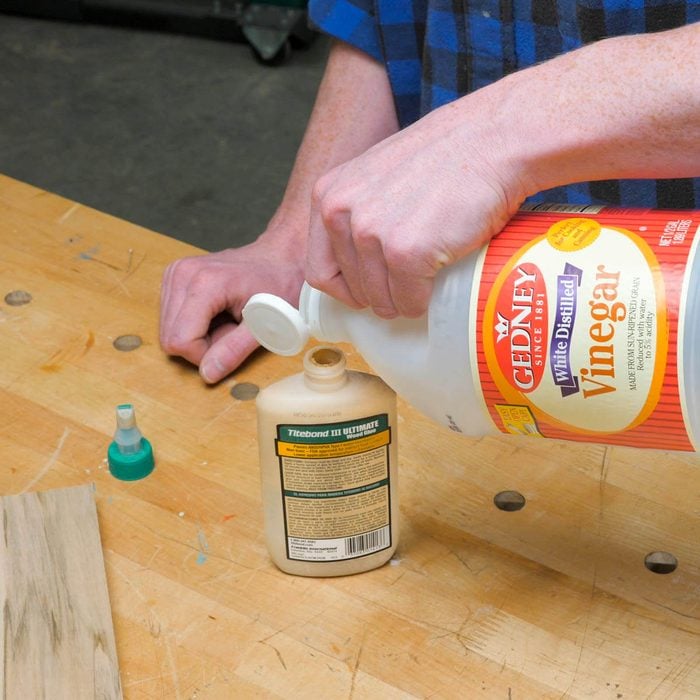
That Glue is Still Good!
I recently wrote to the Borden company, asking what to do when their Elmer's forest glue gets too thick to use. They wrote me back and suggested mixing in a drib or 2 of vinegar. It sounded like an one-time wives' tale, but I tried information technology and found it really works.
20 / 57

Brilliant Miter Saw Cease
I use folder clips for a lot of things effectually the store, and here's one that I thought I'd share. When I need to make multiple cuts nevertheless length, I only clench my colossal binder clip to my fence and utilise a 1/four-in.-thick wood scrap pinched in the clip as a stop. Works similar a charm! When information technology's non in use, I clamp information technology to the cord and so it's e'er nearby. — John Muchow
21 / 57

Align Angles with Tape
Clamping mitered edges tin can be a real hassle because they never seems to line up correctly. The easiest way that I've institute to get effectually this process is to utilize painter's record as clamps. Kickoff gear up the pieces then that the outer edges are facing up and tape them edge-to-edge. The flip the pieces over so the beveled edges are facing up and glue them together. Complete the process by taping the last two edges together and let sit until completed. The tape removes easily and the glue won't attach to the record, making sanding and finishing very simple.
22 / 57
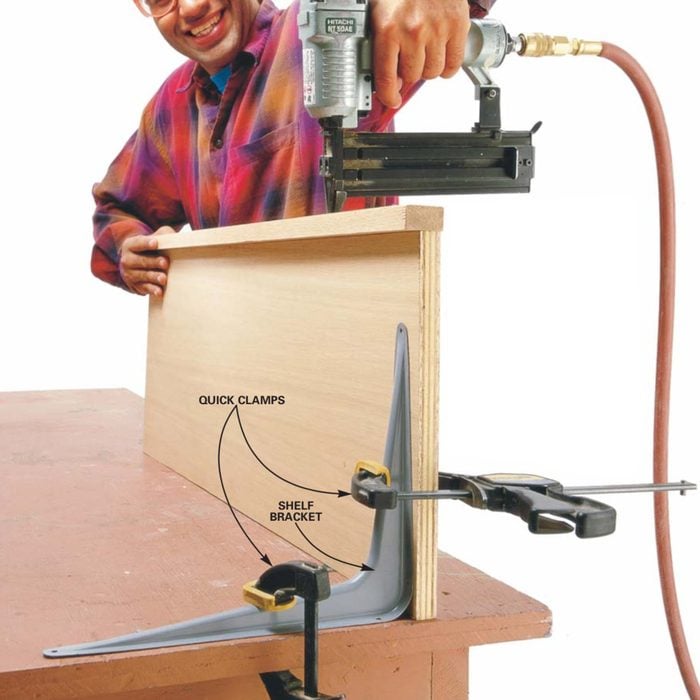
Shelf Bracket to the Rescue
Brace skinny material on edge with this slick system. Clench a shelf bracket to a workbench, stand the fabric on border and then clench it to the bracket. The clamp will hold the cloth, keeping your hands free for other operations. — Azha Jensen.
23 / 57
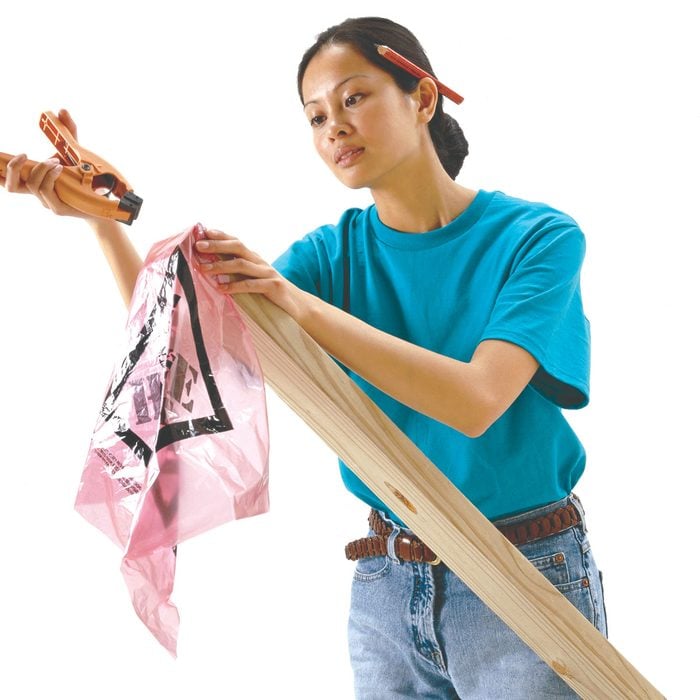
Transportation Flag Clamp
If you have to pick upward long lengths of wood from the lumberyard, throw a jump clamp in the back of your vehicle. Use the clamp to attach the warning flag to the end of the protruding lumber. The clamp's easy to sideslip on and off, and yous won't accept to fuss around with staples, nails or string. — Steve Parker.
24 / 57
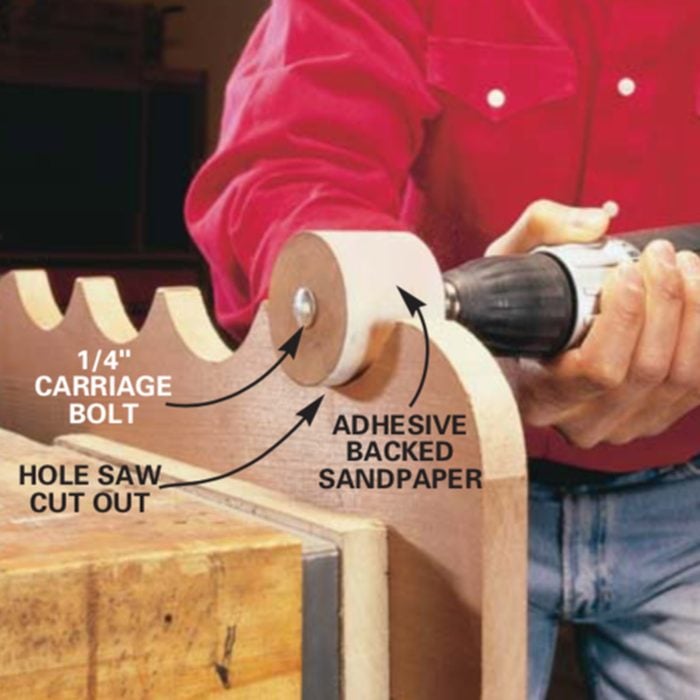
Pigsty Saw Pulsate Sander
Sanding the inside of a hole or curved surface can be hard. To simplify that task, insert a 1/4 ten three-in. commodities into the pilot hole of a pigsty-saw cutout. Secure the bolt with a washer and nut. Using a hacksaw, cut a 1/4-in. deep slot in line with the bolt. Cut a piece of adhesive-backed sandpaper so that y'all can slide one end into the slot, wrap it around the cutout, and slide the other end back into the slot. Chuck the bolt into a drill, and you now have a homemade drum sander. — E.R. Comstock.
25 / 57
Hand Plane Hack
Here's a way to joint or shape piece of work pieces that are besides modest to hold in a vise. Flip a hand aeroplane upside downwardly and clamp it in your bench vise. Now you lot tin pass the woods over the airplane to joint the edge. — Matt Boley.
26 / 57
Shop-Made Finishing Standoffs
Tired of waiting for finish to dry on one side earlier finishing the other side? You can buy standoffs, but it's also really like shooting fish in a barrel to brand them yourself. Simply bulldoze 2-in. drywall screws through 2-in. x 2-in. squares of 3/4-in. thick stock. The screw points volition leave a divot in the finish that can be touched up later, only I always let the back side of my project rest on the screws while the finish dries. — Matt Boley.
27 / 57
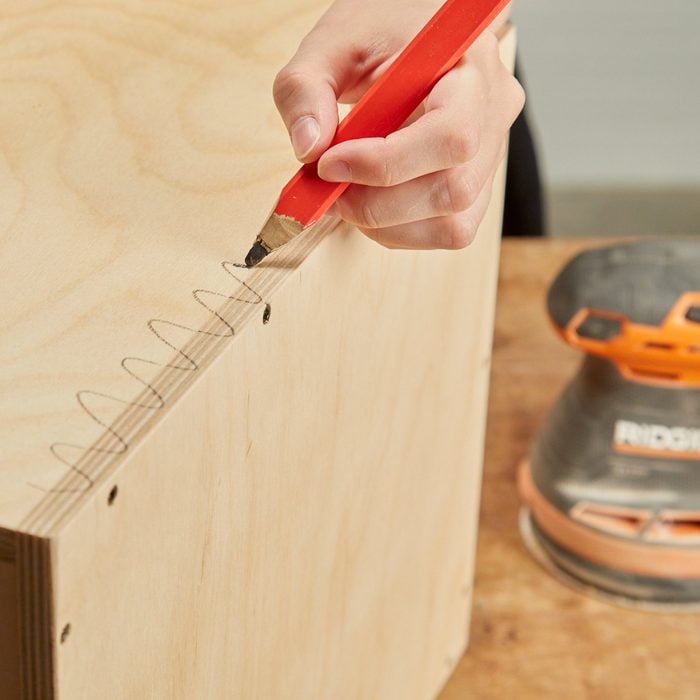
Visual Help for Sanding Even Surfaces
With an orbital sander and proficient sandpaper you can smooth wood evenly and hands with first-class results. When flush-sanding solid edge-banding, depict a squiggly line across the joint before sanding. The edge-banding will be slightly proud of the plywood veneer, and then the pencil marks provide a visual aid to make sure that you're sanding flat, and that you don't sand through the plywood's veneer. Every bit you go, you can as well examination for a smooth, level transition by gently scraping your fingernails confronting the transition. If it's smooth, your fingers volition not catch on the seam between the two pieces
28 / 57

Catch Wood Chips with PVC Pipe
My planer blasts shavings all over the store floor. I decided to brand my ain dust chute from 4-in. PVC sewer pipe (which has thinner walls than regular Schedule 40 pipe) and a couple caps. I cut a slit in the pipe and used a heat gun to soften the plastic. That immune me to open the slit. (Heating PVC releases fumes; ventilation is disquisitional.) I and then drilled holes in the flap and screwed it to the planer housing. Finally, I cut a 2-1/2- in. hole in one of the stop caps to take my shop vacuum hose. Works peachy! — Luis Arce.
29 / 57

Make Your Own Super-Strong Sandpaper
"I do a lot of cease-sanding freehand, without a sandpaper block, so I can smoothen edges and go into nooks and crannies. Simply the finer grits are usually bonded to thinner paper and, at least for me, the newspaper is too thin and ends up tearing long before the grit wears out. So I apply duct tape to the back of the sandpaper. The sandpaper is still flexible enough to sand a tight radius and it's far more durable. Y'all can use this super-stiff sandpaper like a shoeshine rag." — Chuck Merchant
30 / 57
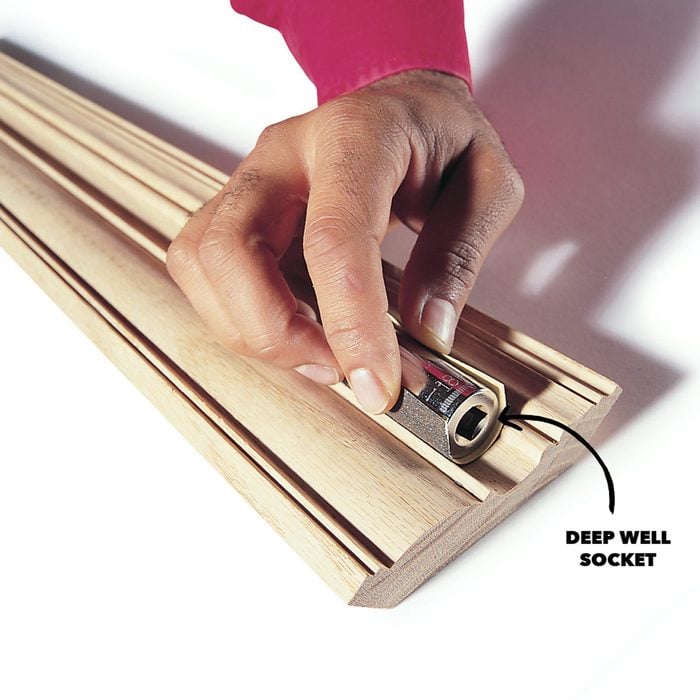
Socket Sander
Sanding concave molding doesn't have to be difficult. Find a deep socket that fits the contour of your molding. Wrap a piece of sand- paper around the socket and hold it in place with your fingers. Your sanding will be uniform and the delicate edges of the molding won't round over. — Eric and Cheryl Weltlich.
31 / 57

No Slipping, No Splinters
To foreclose friction burns and splinters while sanding a curved tabletop, I put on a leather glove and wrapped painter's record around it, sticky side out. The tape kept the sandpaper from slipping, and the glove protected my hand. — Eliot Sennett.
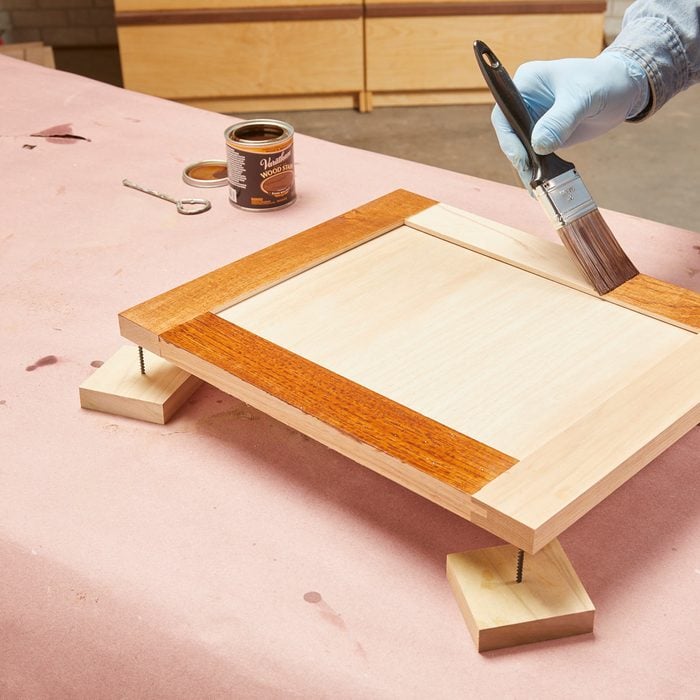
32 / 57
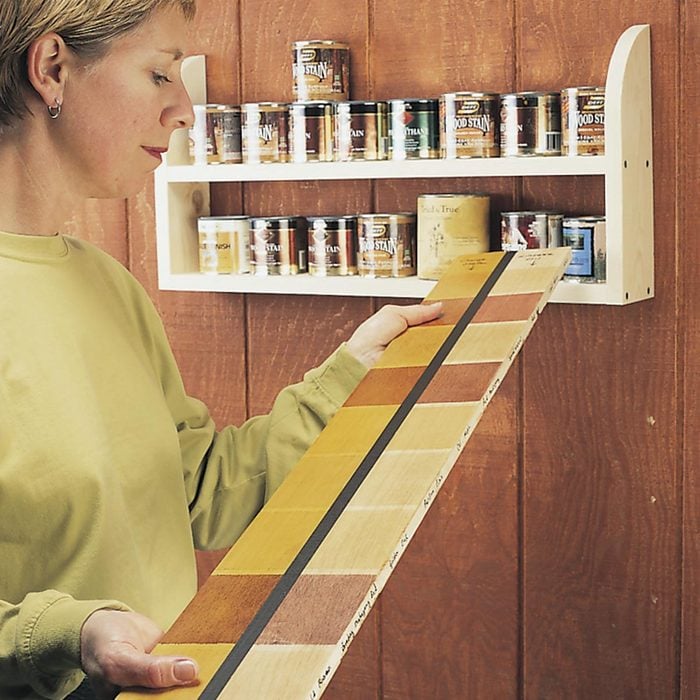
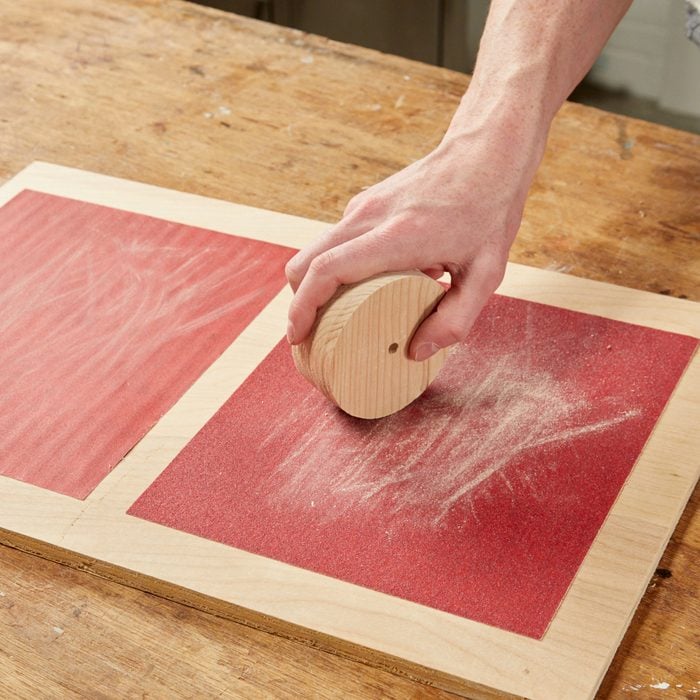
Make a Stain Index
Hard to determine which stain you demand in that bespattered collection of cans? An easy-to-make "stain alphabetize," courtesy of reader Bob Jacek, solves the problem. Section off boards of your favorite woods into squares with masking record, and utilize the different stains across the width of each wood type (pine, oak, birch, etc.). When the stains are dry, brush on lengthwise your regular finishes—polyurethane, water-based polyurethane, oil, orange shellac, etc. You lot'll be able to tell how each stain looks with each finish. Label each one. Use both sides of each lath, and you'll have a wooden encyclopedia of stain and finish combinations.
33 / 57

Stretchy Clamps
Old bicycle inner tubes piece of work great for clamping odd-shaped projects. I used them recently to concur the rungs secure in a set of chairs I glued up. Just knot the tube to the right size and and so stretch it over. Set the chair on a flat surface as the glue dries. The tubes can handle jobs that conventional clamps just tin't. — Allen J. Muldoon
34 / 57

Brand a Mixing Block
I mix a lot of epoxy in small batches, but I've seldom had the right size container on hand. I solved this trouble by drilling 1-ane/2-in. holes in 2×4 scraps with a Forstner bit. The resulting shallow "cups" allow like shooting fish in a barrel mixing without the risk of spilling. When the holes are used upward, I just make a new mixing board. — Bill Wells.
35 / 57
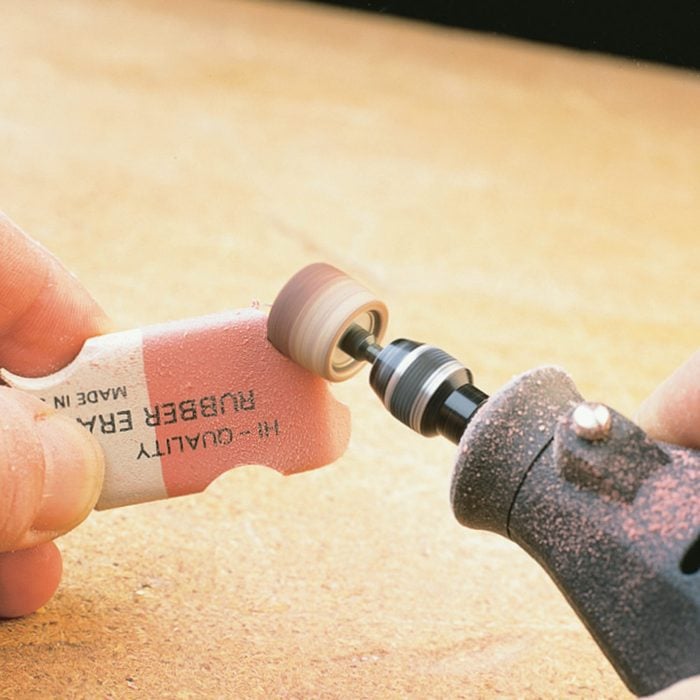
How to Clean Your Mini Drum Sander
When your rotary tool'south sanding drum gets chock-full, refresh the surface with a condom pencil eraser. Run the tool at low speed and printing the eraser into the clogged drum to rub out the fries and gunk. Check out this pencil hack for perfectly flat boards.
36 / 57

Super-Small-scale Parts Sander
I'k 91 years old, merely I still enjoy spending time in the forest store. I like to brand wooden toys and give them to my neat-grandkids and clemency groups. Ane pull a fast one on I've learned over the years is to use emery boards—the kind for filing fingernails— to sand small parts. Emery boards come up in different sizes, and some are more annoying than others, so I keep an assortment on hand. — Joe Aboussleman
37 / 57
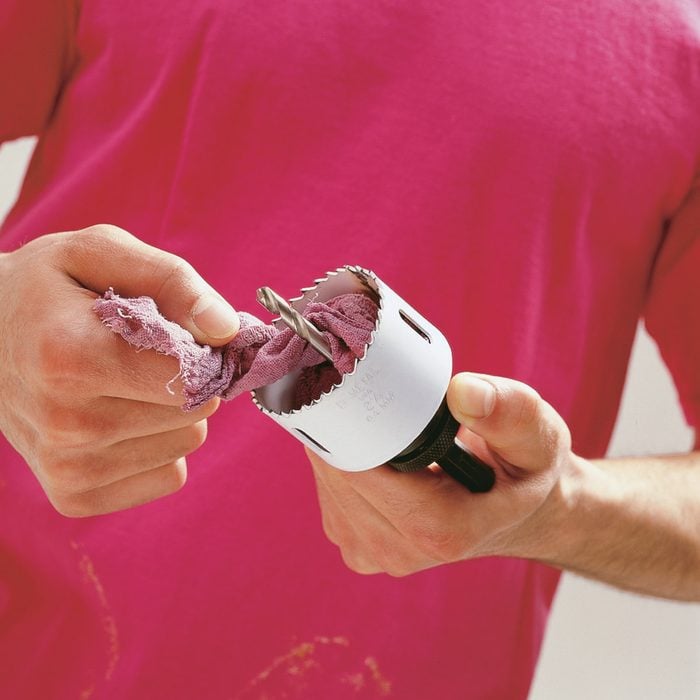
Hole Saw Saver
Stuff your hole saw with a moist rag. It will not simply go along your saw libation and the teeth sharper but also extend the life of the saw. Remember to exit room for the depth of the piece of wood you're cutting. When you're finished, dry off the saw to prevent rust. — Scott Nugent.
38 / 57
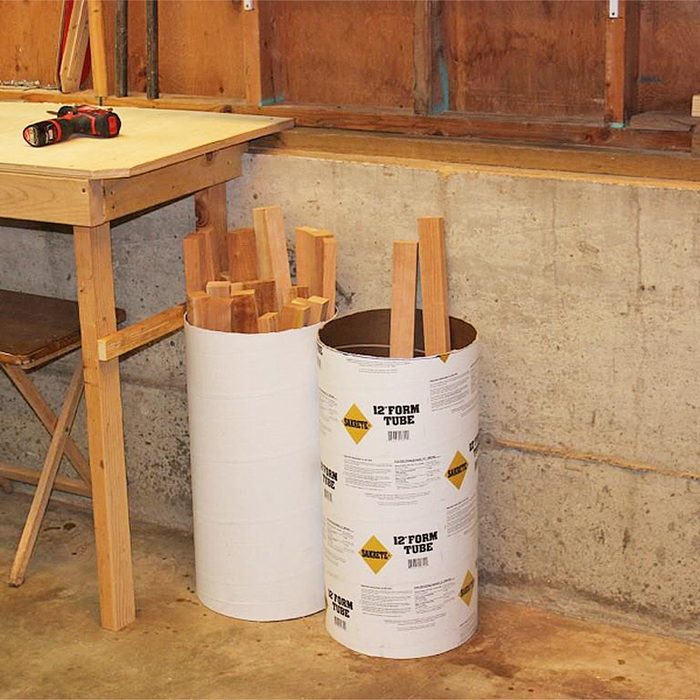
Apply Concrete Forms for Scraps Storage
Curt scraps of hardwood are too practiced to throw away but hard to shop neatly. So I bought a 4-ft. tube form made for physical footings, cut it in half (the cardboard-like material cuts hands) and set the tubes on end. I tack the tubes to a wall or a bench leg then they don't fall over. With the woods scraps stored upright, it's easy to notice a piece just the right length. Tube forms are available in various diameters for $v and up at domicile centers. — Neb Wells
39 / 57
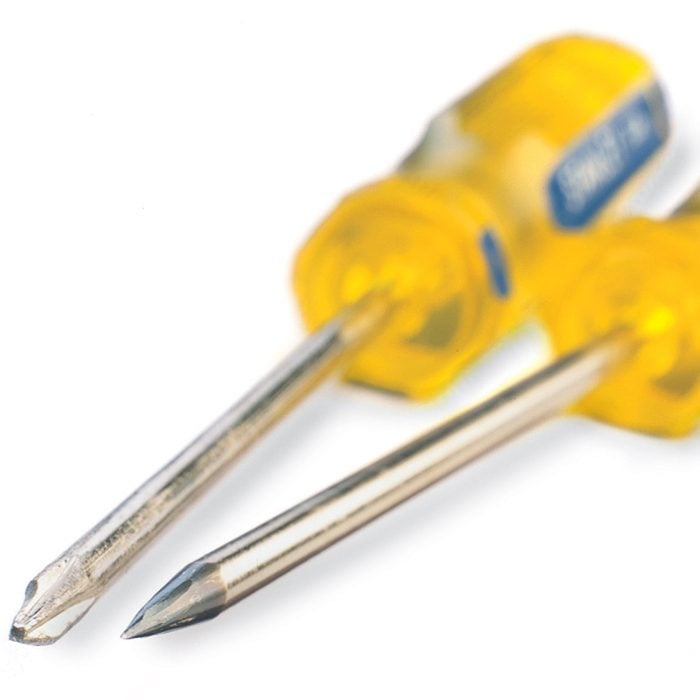
Demand an Awl? Make One
Can awl of us find our awl when we need it? Grab an quondam, battered Phillips screwdriver and grind the tip into a sharp cone shape on a demote grinder. (Wear eye protection.) At present you take a heavy-duty awl for starting screws and cease nails correct on the marking, and chipping stale mucilage from projection corners.
40 / 57

Mustard Bottle is Perfect for Glue
I no longer put upwardly with the messy "over-designed" carpenter's glue dispensers. Instead, I utilize old mustard bottles; they don't clog and they hands reseal between uses. — Richard Painter.
41 / 57
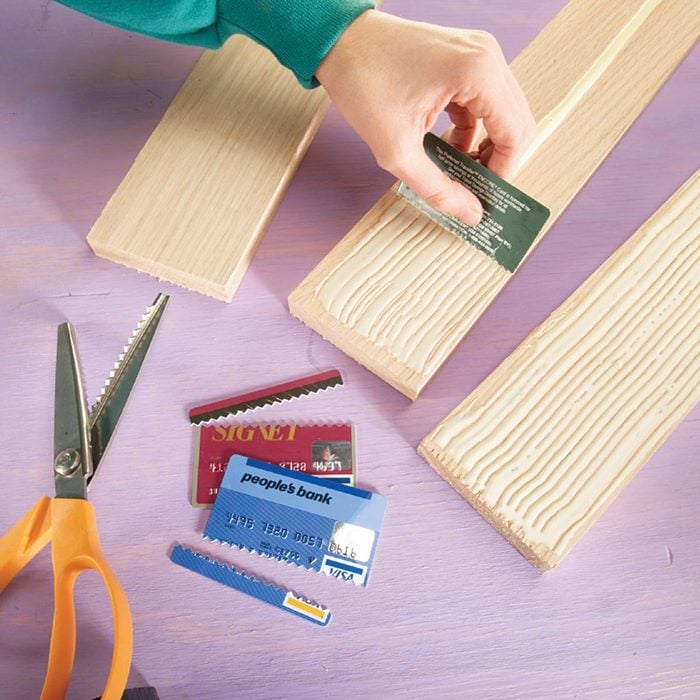
Pocket-Size Glue Spreaders
When confront-gluing boards, use a credit card snipped along its broad edge with a pinking shears. The serrated "pinked" edge spreads the mucilage like a serrated trowel spreads mastic on floors. Thanks to reader Don Cox for this polish tip.
42 / 57

DIY Uncomplicated and Secure Sanding Cake
Not happy with the option of sanding blocks at the hardware store, I made a few of my own from hardwood scraps left over from a woodworking project. I cut each one to 3/four in. x i-i/2 in. ten four-one/two in.—which is only the right size to wrap a quarter sail of sandpaper around. And the "kerf" cut helps hold the sandpaper in place until I'm gear up to alter it. —Tim Olaerts.
43 / 57
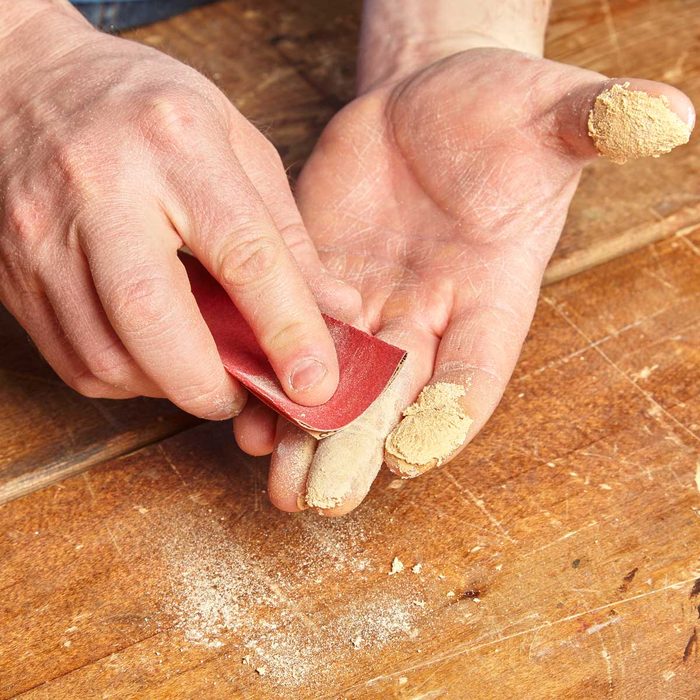
Sand Your Hands
Some types of forest filler can be difficult to get off your easily afterward they dry out, particularly if you use your fingers to push it into minor cracks and holes. When that happens, I reach for fine grit sandpaper and sand information technology off my fingers. Information technology's bully for removing dried-on polyurethane mucilage and canned cream from your easily, too. — Chris James.
44 / 57
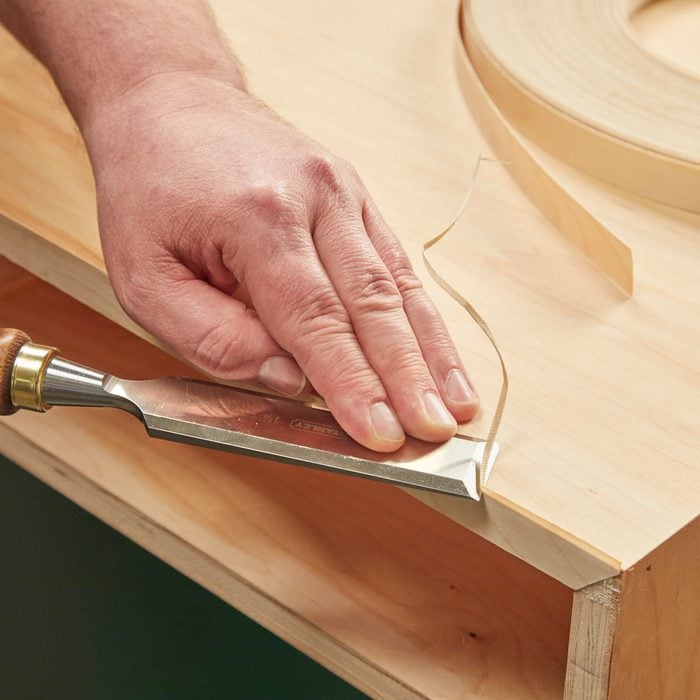
Trim Edge Banding with a Chisel
Fe-on edge-banding is a quick style to cover up an edge on plywood. Trimming the backlog, however, is tricky. I've tried border-banding trimmers, simply I detect the results are unpredictable. With the trimmers I've tried, it wasn't easy to change the direction of the cut to adapt the grain management of the border-banding. If you're cutting against the grain, you lot're likely to tear out a chunk of your new edge-banding. Instead, I apply a broad, abrupt chisel. This way, I can read the grain management and trim appropriately. Bending the chisel slightly and become wearisome, raising the back corner of the chisel merely enough and so that it doesn't dig into the plywood veneer. Smooth the corner with a sanding cake after trimming.
45 / 57
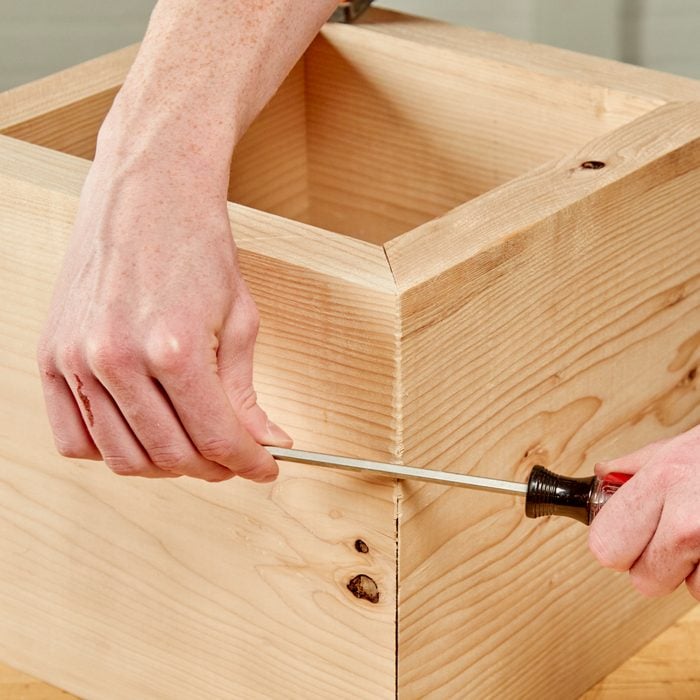
Quick Miter Set
Cutting a miter joint that closes upward perfectly and maintains a 90 caste angle is really satisfying. Unfortunately, it doesn't always happen. Here'south a quick fix for a slightly open miter joint; rub the shank of a screwdriver along the miter at a steep angle, from both sides of the articulation. Chances are, you'll be the only one that knows it wasn't perfect to begin with.
46 / 57
An Extra Hand for Cutting Sheet Goods
Here'due south a safe and audio fashion to make long cuts with a circular saw on plywood clamped to a worktable. Cut near 12 in. into the plywood, then twist a piece of duct tape into a bow tie, with up-and-down adhesive faces. Slide it in the saw kerf and printing the tape downwards to a higher place and nether the plywood. Now every bit you finish the cutting, the trailing cease can't curl down dangerously as y'all saw. Hats off to Mike Connelly for simplifying this chore.
47 / 57
Sanding Station for Pocket-sized Parts
Sanding small items is tricky, as they're hard to clench in a vise to work on them. So instead of bringing the sandpaper to the workpiece, I bring the workpiece to the sandpaper. I gum sheets of sandpaper to a piece of plywood; threescore and 100-grit on ane side and 150 and 220-grit on the other. Spray agglutinative works well for this. Since there's sandpaper on both sides, my sanding board doesn't slide around on the bench
48 / 57
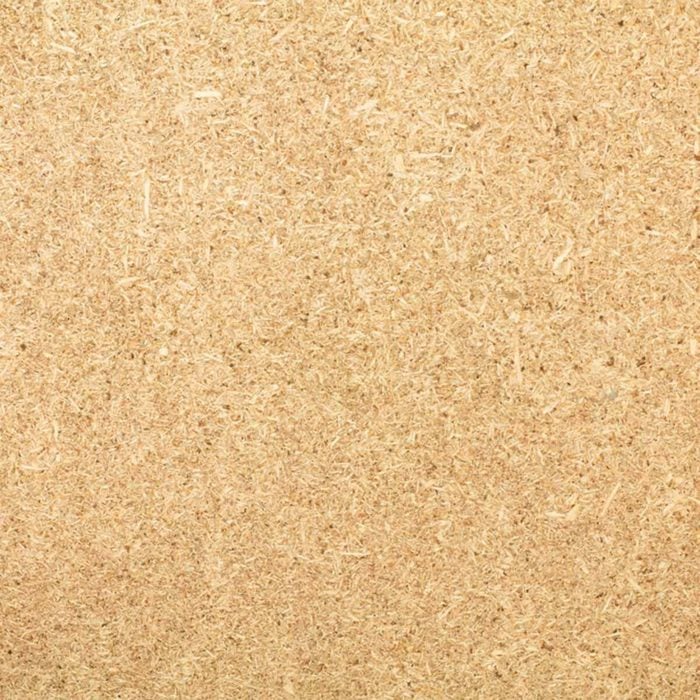
What is particleboard?
Particleboard is a manufactured woods product composed of sawdust, wood fries or wood shavings mixed with a resin. This concoction is layered, compressed, subjected to heat and cut to shape, resulting in a sheet material that can be used for a variety of things. Information technology's often used equally shelving or as an underlayment for carpet. Plastic laminate may exist applied to both sides to create a product that can exist used to create everything from piece of furniture to cabinets to wall paneling. Head into IKEA and yous'll find acres of particleboard.
There are a few things particleboard is Non. Information technology's not medium density fiberboard (MDF)—a material with greater density and weight equanimous of more than compatible particles. It'south Non oriented strand board (OSB), a cloth composed of large wood chips and strands that's structurally equivalent to plywood. Information technology does Not have great nail or screw holding power, nor is it all that water resistant; h2o can quickly crusade the material to dandy and lose structural integrity. Only if you need something flat and cheap for use in a dry place, particleboard will do you proud.
49 / 57
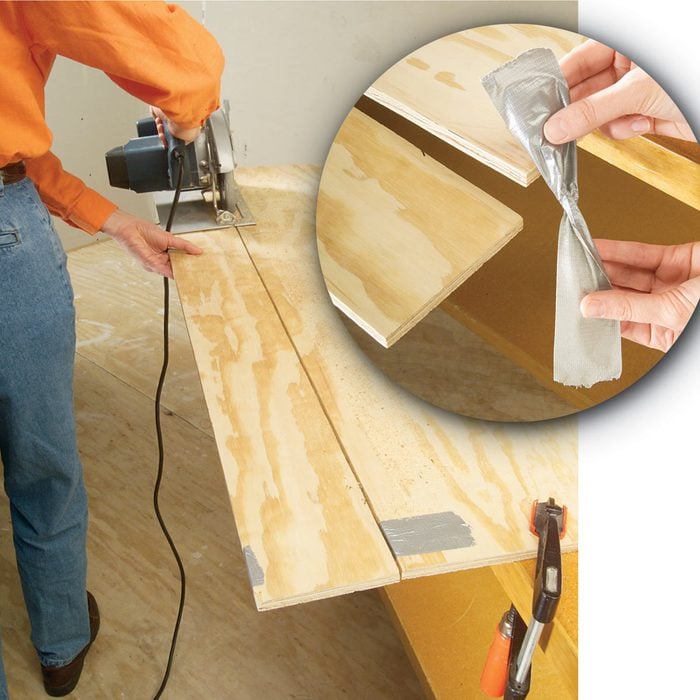
Poor Human being'due south Jointer
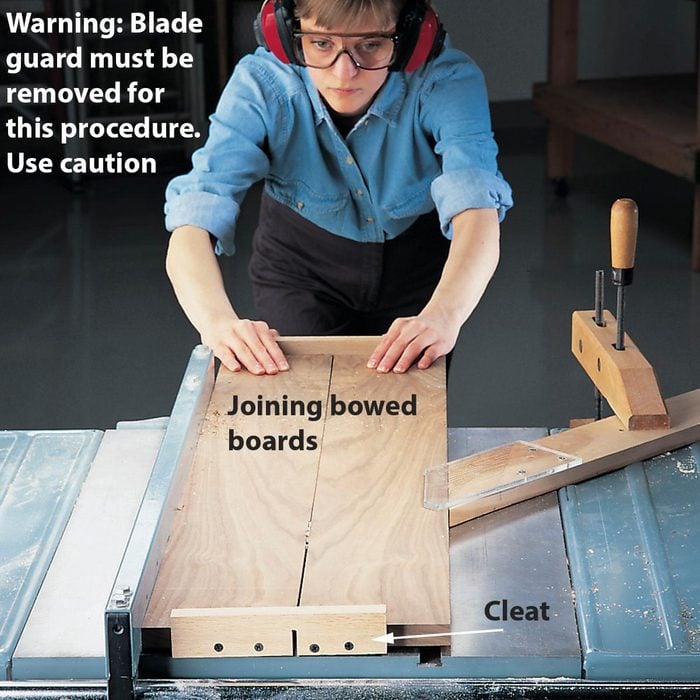
Lacking a jointer? Use reader Court Kites' awesome tip to create perfectly matched glue joints on wavy or bowed board edges. Lay the boards on a flat surface, so clamp them across the middle with a bar clench. Lay two viii-in. long past 1-3/4 in. wide scrap boards beyond each cease and spiral them in with four 1-1/4 in. long screws, two per lath. Keep the screws well abroad from your future cutting line!
Set the table saw fence so the blade is centered on the seam, then button the whole affair through the saw. If the board edges are quite bowed or curvy, you may need a second pass. If and so, unscrew the cleats, reclamp the boards across the middle eye, and so spiral on the cleats again. The screws ding upward the ends of the boards a footling, and then cutting the boards you're jointing a bit long, so trim 1/2 in. from each end to remove the screw holes.
fifty / 57
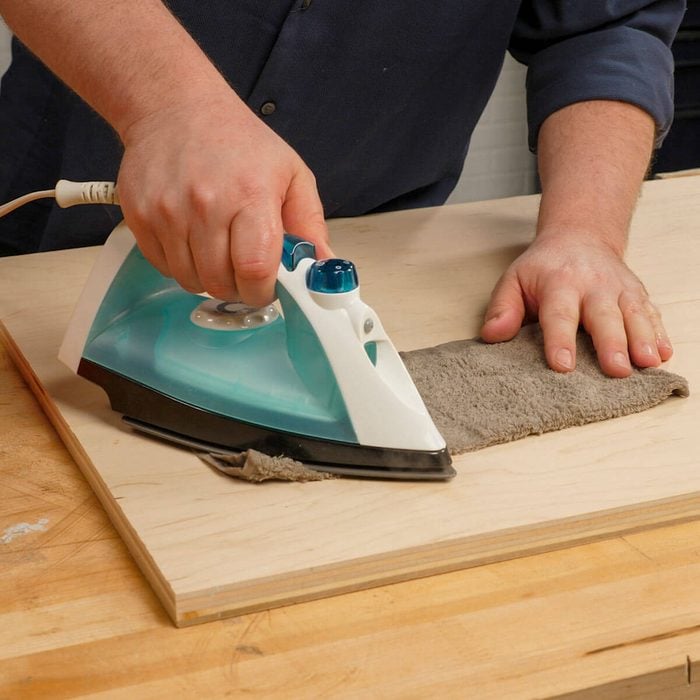
Quick Set for Dents
Dents in forest surfaces tin can be annoying. But fret not, they tin can be fixed. Simply soak a washcloth in water and ring it out a bit and then it's not sopping moisture. Put the damp washcloth on the affected area. The water will wick through the woods, and that's fine. Now, with your atomic number 26 on its highest setting, place it on the clammy washcloth over the affected expanse, and brand small movements back and along and in circles. Press down firmly and continue until your launder cloth is dry. Information technology won't take long to evaporate. At this point, the forest fibers are absorbing the h2o and should expand back to where they were originally. Continue this process and repeat by adding more h2o until the dents rise up to be flush with the rest of the cloth.
51 / 57

What is Pocket Screw Joinery?
Pocket screw joinery is a system—employing special drill and commuter $.25—used to join boards or pieces of plywood to one another. Installing pocket screws involves using a jig to drill a sharply angled, 15-degree pigsty through the dorsum of one board, so driving a special screw through that hole into the second board to depict them tightly together. It's often used in cabinetmaking and piece of furniture building. The term "pocket" comes from the blueprint of the hole which contains an upper "pocket" for the head of the screw to push button against; this pocket also hides the head of the screw.
Pocket screws create a solid, simple-to-make articulation. Because of the size and visibility of the pigsty, it's usually located in areas that are concealed or rarely seen (though special plugs can be used to fill the holes.) Craig Sommerfeld, founder of The Kreg Tool Company, is credited with popularizing pocket screw joinery in the 1980s. The company today is the leader in creating the jigs, clamps and screws used to create pocket screw joints.
52 / 57

Sanding Pad Replacement
The rubber cushion on my old palm sander was wearing thin around the edges. Because of its age, I couldn't observe a replacement pad. As I was drinking my beverage with a cream tin can cover effectually it, I realized I could cutting the foam to fit the sander and mucilage information technology on. I peeled off the erstwhile pad, cleaned the metal base of operations and attached the cream with contact cement. Works for clench-on as well as stick-on sanding squares! You tin find tin can covers at discount and convenience stores. — Allen J. Muldoon
53 / 57

Brand a Portable Bench Vise
Instead of permanently mounting my 6-in. vise to a workbench, I fastened information technology to scrap plywood and so I can clench it wherever I need information technology. Stack two pieces of 3/4-in. plywood and screw them together with 1-1/four in. drywall screws. Marker the vise-mounting holes on the plywood and drill three/4-in. guide holes through both pieces. Recess the nut by drilling through the bottom sheet with a i-in. spade bit using the three/4-in. hole as a guide. Spike the vise to the plywood with bolts sized to friction match the vise-mounting holes. If the bolt shafts are also long, cut them off with a hacksaw. — LuAnn Aiu.
54 / 57

No-Slip Sandpaper
Whenever I use sandpaper sheets that are folded in half, the sandpaper slides on itself as I sand. To solve the problem, I simply spray a light glaze of contact adhesive on the back of the sheet. One time it has air-dried for a couple minutes, I fold the sheet in half for a permanent bond. Works like a charm. — Brian Flynn.
55 / 57

How to Renew Quondam Epoxy
A while back, I reached for my 2 containers of epoxy and noticed that the resin in ane container had crystallized exactly similar dearest that'south been in the cupboard too long. The solution is exactly the same as well: Gear up the container in a bowl of hot tap h2o. After virtually 15 minutes, I emptied the container and refilled it with hot h2o. Subsequently about a half hour, the epoxy regained its normal consistency. Good as new. — Ken Holte
56 / 57

Simple Plywood Cut Station
When cutting full sheets with my circular saw, I use plastic shelving units as sawhorses. The height is only right and by using three of them, I can make cuts in any direction and the plywood is fully supported. And because the shelving units are made of plastic, I can cut right into them without worrying that they'll damage my saw blade. — John Tinger.
57 / 57
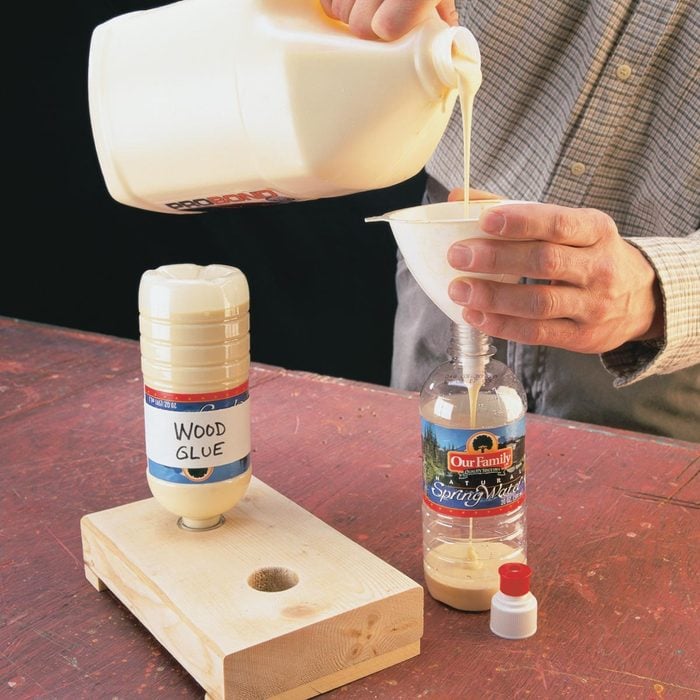
Spare Glue Bottles from the Recycling Bin
Here's a nifty tip—with a bully tip—from faithful reader Don Ayers: Make full snap-capped sports water bottles with glue and stick them upside down in a hunk of 2×vi. Now you don't have to look for the mucilage to meet the neck of the bottle, and the cap will control mucilage menstruation (and never get lost). To holster the glue dispensers, cutting holes in the base with a spade scrap that's a smidgen larger than the cap'southward diameter.
P.South. Be certain to snap the hat closed before returning the bottle to the base of operations. Otherwise the whole bottleful of mucilage will run out! The snap-cap makes an airtight seal and controls bead size when you clasp.
Originally Published: February 10, 2021
Source: https://www.familyhandyman.com/list/56-brilliant-woodworking-tips-for-beginners/
0 Response to "Planning Flat Boards With a Draw Knife Videos"
Post a Comment